Table of Contents:
You need a Java version >=1.4 in order to use HandAlign, as well as the HandAlign JAR file. To run it, you type:
% java -jar HandAlign.jar -t <topfile> -b <bottomfile> -a <alignmentfile>
Thus, you would run something like:
% java -jar HandAlign.jar -t /nfs/nlg/users/hdaume/ziff-corpus/abstracts/ZF109-553-459 -b /nfs/nlg/users/hdaume/ziff-corpus/documents/ ZF109-553-459 -a ZF109-553-459.alignment
If you're running from home or elsewhere, you should know where you put your documents and can specify those locations.
Additionally, if you're doing sentence-to-sentence alignments as in machine translation, use the command-line argument "-s". For the rest of this documentation I will assume you are not running in sentence mode, but everything works the same.
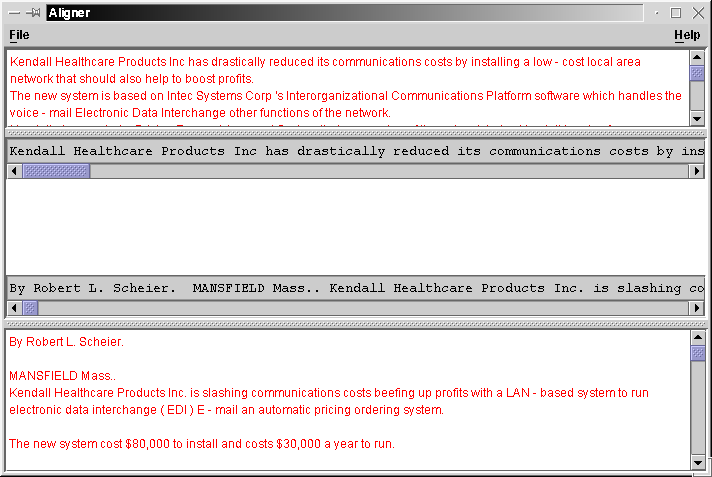
When you first run HandAlign, you will be presented with a screen which looks something like:

The top text area (in red) contains the summary. The one immediately below that also contains the summary, but spread across a single line (in black). The large white space below that is where your alignment will be drawn (we haven't done any aligning yet, so there's nothing there!). Just below that is the original document, all in one line and below that, the whole document printed nicely.
The reason that the white summary and document boxes have all their text is red is because none of the text has been aligned. Words which have been aligned turn black. This makes it easy to see what you have and have not aligned.
By reading the summary and the document, we can decide that we want to align the first thee words in the summary to the identical three words in the document. If we click on the first instance of the word "Kendall" in the whole-document window, the zoomed-in document window will scroll there (the same goes for the summary windows).
We can then click on "Kendall" in the zoomed-in summary window; this will cause a red dot to be drawn below it, signifying that this is the currently selected word on that side. We then click on the corresponding "Kendall" in the document and a line is drawn. Note that both words now turn black. We now have something like:
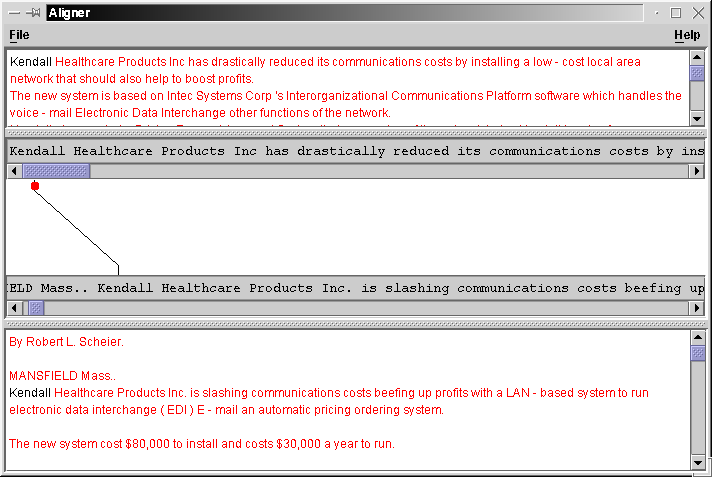
We can now continue this process of clicking on a word in the summary and then in the document to align them.
There are two "levels" of alignment, "certainly aligned" and "possibly aligned." Certain alignments are drawn in black (and the corresponding words printed in black); possible alignments are drawn in magenta. To change a certain alignment to a possible alignment, simply make the alignment again. To remove the alignment, do it once more. In this case, since "Kendall" is still selected on the summary side, we need only click on "Kendall" in the document again to toggle it. Of course, we don't really want to do this, since these words are certainly aligned.
Words can align to multiple words on each side. After aligning a bit more of the document, we might have something like:
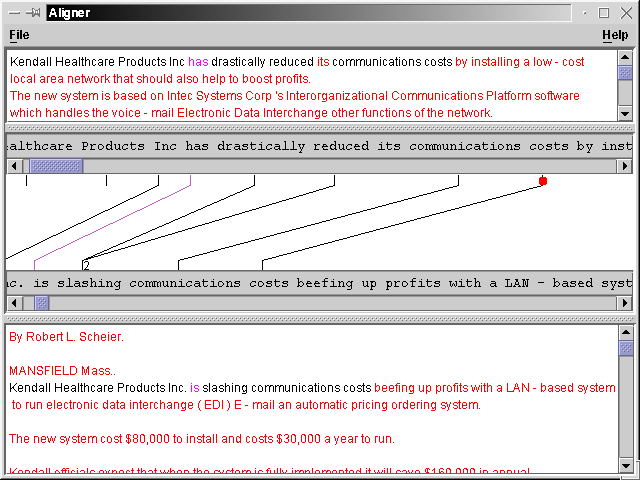
Here, we see a few new things. First of all, the alignment between "has" and "is" is in magenta because it's only a possible alignment. Furthermore, since the word to which "Healthcare" on the summary side isn't on the screen on the document side, only the stem of the line appears.
You will also notice that "slashing" on the document side has the number
'2' written next to it. This is to indicate that there are two words
that it is aligned to. Since one of these may have been scrolled
off, this is the only way to know how many alignments each word has.
HandAlign differentiates between word-level alignments and phrase alignments. Word alignments are considered to be more basic, so they are easier to create. Phrase alignments aren't too difficult; however, it is easy to make a mistake. Here are the list of steps to create a phrase alignment:
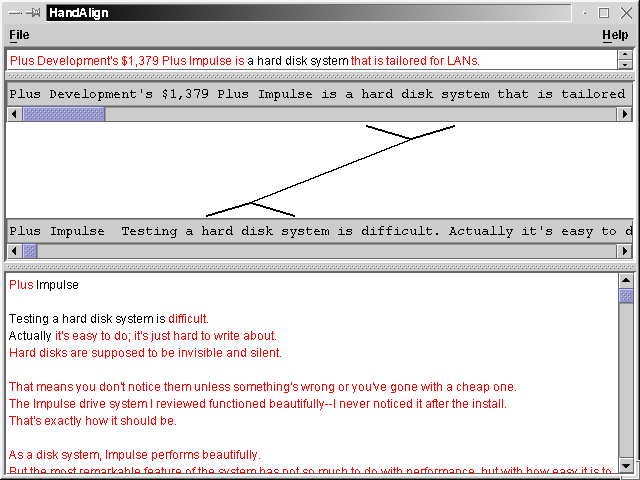
The only difficult thing at this point is that we don't want to continue making phrase alignments using the currently selected phrases (usually). So we need to deselect them. To do this, first select a word on the summary side, then deselect it by clicking on it again. Do the same on the document side. You may now proceed to align as usual.
Right clicking:
Doing alignments in the above-specified "click summary/click document/click summary/..." manner is very tedious and will doubtless lead to RSI on your wrist. Thus, certain shortcuts have been set up. If you right click on the document zoomed-in text, it will advance the summary pointer one word; similarly, if you right click on the summary zoomed-in text, it will advance the document pointer one word. If you hold down shift while right-clicking, it will move the pointer back one word.Clicking in the whole text:
If you click on a word in the whole-document text, it will scroll the partial text to just before that word; similarly on the summary side.Clicking on the alignment stems:
If you click on the stem of an alignment on the document side, it will scroll the summary zoomed-in display to the first word aligned to that document word. If you click again, it will scroll to the second word, then the third word, etc., finally wrapping back around when there are no more aligned words. The same goes for the summary stems.Keyboard shortcuts:
There are keyboard shortcuts for moving the word selectors on each side and for modifying alignments. The 'j' key moves the summary marker one to the left, the 'k' key moves the summary marker one to the right. The 'm' and 'n' keys do the same things for the document marker, respectively. Pressing the spacebar toggles the alignment of the selected word pair.Whole document popup:
When you right click on a word in the whole document view, it will pop up a menu with two options: 'Clear all alignments' and 'Align to everything.' The first option does the obvious: it removes all alignments for this word. The second marks that this word is aligned to everything, though this is represented with a star (*) under the word in the alignment view, not with 100,000 lines.Reference Resolution
As of version 0.95, HandAlign supports a new mode for doing reference resolution. You load up your document and abstract and alignment exactly as before (if you are doing single document reference resolution, simply load a blank or bogus document on the other side). Then, go to the "tools" menu and choose "switch mode". The title bar will now tell you you're doing reference resolution. Now, you can select words or phrases as before. Once a word or phrase is selected, right click on it in the context window to pull up the reference resolution menu as seen here:
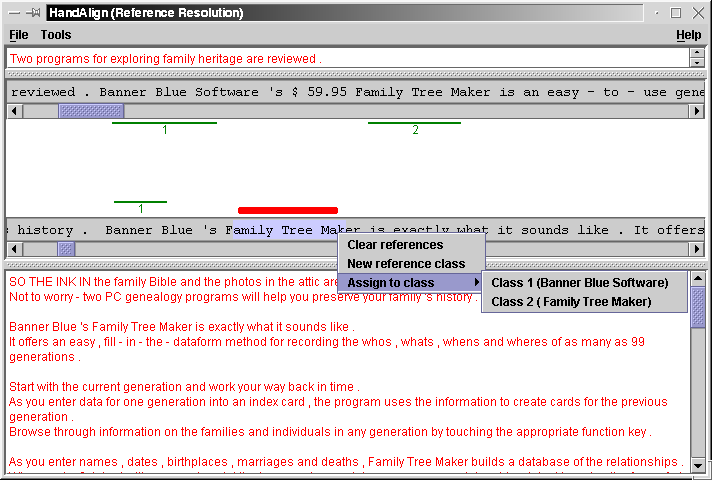
You can choose to clear reference (remove this from its currently assigned class, if any), create a new reference set, or add it to one of the existing reference sets, as shown in the menu.
File FormatsThe input file format is simple. Each line should contain one sentence, pre tokenized. If you want a paragraph break, leave a blank line in between two sentences.
The alignment format is also simple. For each word in the summary, there is a separate line in the alignment, containing space-seperated pairs of document-word-id and alignment strength. That is, if the third word in the summary is aligned to the seventh word in the document with strength 1 (possible) and to the nineth word in the document with strength 2 (certain), then the third line in the alignment file would read "7 1 9 2".
After one line per summary sentence, the next line will contain a space-separated list of all document words which are "Align to All"ed. Following that (possibly empty) line, is one line for each phrase alignment. Each of these consists of five space-separated integers. The first is the beginning word number on the summary side, the second is the end word number on the summary side; the third is the beginning word number on the document side, the fourth is the end word number on the document side; the fifth is 1 or 2 depending on the strength of the alignment.
Lines which begin with a pound sign are comment lines; the first line should be a comment line with two integers: the width and height of the array (the first is the number of lines in the alignment file, the second is the possible width of each line).
Additionally, after all the alignments, the references are stored. These lines begin with a pound followed by an 'R' followed by four numbers: the start word, the end word, the side (0=top, 1=bottom) and then the class ID number.
You may download the distribution as a JAR file here (version 0.95): HandAlign.jar (if you click on this and get a security error, try right-clicking and choosing 'Save to disk')
There is also software available for calculating precision and recall metrics for alignments (assuming you have a "gold standard"). This is implemented in Haskell; the source code is available here (email me if you want binaries): ScoreAlignments.hs. There is also code for converting GIZA++ alignments to HandAlign alignments here: GizaExtract.hs. You'll need a Haskell compiler/interpreter to use them.
You can download the summarization annotation guide in either postscript or acrobat format here: [manual.ps] [manual.pdf].
Questions, comments, suggestions, please email me at hdaume@isi.edu.